Beginners Guide to Surfing: Safe First Steps in the UK
Hayley
Your group has arrived in Newquay, someone's already carrying a hired board, and the waves look much bigger from the...
Share This Article
Your group has arrived in Newquay, someone's already carrying a hired board, and the waves look much bigger from the sand than they did on a phone. You've only got today to try surfing. That's exactly when you need permission to change the plan.
A useful beginner's guide to surfing starts with deciding whether to enter the water, not with standing up. In UK seas, choosing a manageable beach, a properly fitted wetsuit and an instructor who'll cancel when necessary matters more than enthusiasm.
Go or No-Go Conditions for Your First Surf
Say a student group arrives for a fixed day trip and finds waves dumping hard onto the main beach. Rather than hiring boards anyway, they call their school and move to a gentler bay where an instructor has assessed the conditions and is running a lesson. The important decision happened before anyone got wet.
Use this table as a screening tool, not permission to surf without local advice. Surfing England's beach-safety guidance identifies spilling or crumbly waves as generally suitable for beginners, unlike powerful, hollow waves.
Go or no-go conditions for a beginner
Condition
Good for a first session
Postpone or move beach
Wave height
Under about 1.5 m and no bigger than head height for a standing surfer, subject to instructor approval
Larger than head height, or the instructor says no
Wave shape
Spilling or crumbly waves that break gently over a slope
Dumping, pitching or hollow shore break
Wind
Light onshore or cross-shore breeze
Strong offshore wind that can carry surfers out
Beach
Sandy, gradual slope, lifeguarded
Rocky reef, steep shelf or unpatrolled cove
Rips
No apparent channel of flatter, churned water running seaward, with the area checked locally
Visible rip channel or debris drifting out to sea
Flags
Surfing inside black and white flags
Outside the designated surf area, or red flags flying
Crowd
Room to paddle clear of other surfers
Packed lineup with no safe route through
Head height is an upper screening limit, not a target for your first lesson. Smaller, gentle foam is usually the more useful classroom.
Make the decision from the beach
Choose a sandy beach with lifeguards on duty. A lifeguard hut doesn't mean the service is operating.
Check the forecast, tide times and wind direction that morning. A beach that's manageable on Monday can become unsuitable on Tuesday when a swell arrives.
Look for flatter, churned water flowing seawards, gaps in breaking waves and floating debris moving offshore. Not spotting a rip doesn't prove there isn't one, so ask the lifeguards.
Use the black and white surfing area where it's marked, following local instructions. Don't mistake swimming flags for permission to surf.
Postpone or move beaches if any check fails. A quieter-looking cove isn't automatically a safer alternative.
Practical rule: Your itinerary doesn't get a vote on whether the sea is suitable.
Watch several sets before committing. The lull that makes the beach look inviting may end with much stronger waves.
A cancelled session can be the best decision of your first surf trip. The instructor's judgement about wave force, beach shape and your ability matters more than the height displayed on a forecast.
How to Choose a Lesson and Instructor
Start with accreditation. Look for a school in Surfing England's accredited surf school scheme, then ask what qualification the person teaching your group holds.
Surfing England's surf-school scheme specifies waves below 1.5 metres for beginner and novice-improver lessons, with conditions clearly safe and tolerable for the group. It also specifies soft-construction boards with soft decks, soft bottoms and rubberised or plastic fins for absolute beginners and lower-ability surfers.
That's more useful than a promise that everyone will stand up. The instructor must judge whether the wave can move your board and body without overwhelming you, rather than treating advertised wave height as the whole assessment.
Questions to ask before paying
Supervision: How many learners attend, how many instructors supervise, and how will they keep the group together?
Included kit: Does the price cover the wetsuit, board, leash, beach briefing and practice on sand?
Bad conditions: Will the school move beaches, rebook or refund if the sea is unsuitable?
Safety teaching: Will someone explain rips, flags, boundaries and hand signals before entry?
Session length: Does the advertised duration include changing and walking to the beach?
For budgeting, allow around £30-50 for a group lesson of about two hours, with private instruction costing more. Treat that as a planning range, not a quote: season, location and what's included affect the total.
A group lesson costs less and gives solo travellers an easy way to meet people. Private coaching makes more sense if you need adapted instruction, have particular anxieties or want focused feedback.
Avoid schools that promise to teach in any weather, hand first-timers hard boards without explanation, skip the briefing or pressure you into a package on arrival. Expect sand practice, a warm-up and supervised work in the shallows, not an immediate paddle beyond the breakers.
If you enjoy it, I'd book another lesson within the week. Correcting the movement while it's still familiar beats repeatedly practising the wrong version alone.
Gear Checklist and What It Costs
Start with a suitable soft board, a sound leash and a wetsuit that fits. Hire first, because your instructor can match the board to your size and the conditions before you spend money on equipment.
Beginner gear and approximate hire or buy costs
Item
What it does
Hire or buy (approx.)
4/3 mm wetsuit
Provides insulation for many UK sessions
Ask for an equipment-inclusive lesson or a separate hire quote
Soft-top beginner board
Stable and forgiving, with softer contact surfaces
Hire initially; request a quote matched to board size and session length
Leash
Helps prevent separation from your board, but doesn’t replace board control
Often included with hire; buy £15-25
Rash vest
Reduces rubbing and adds covered-skin sun protection
Hire usually included; buy £20-35
Surf boots and gloves
Add warmth and protection from abrasion
Hire £5-10; buy £25-50
Sun cream and lip balm
Protect exposed skin from sun
Buy £5-15
Dry bag and microfibre towel
Keep belongings organised and help with changing
Buy £10-25
These are approximate budgeting ranges, not fixed shop prices. Check whether a purchase price covers individual accessories or a complete set.
Warmth and fit before brand
A 4/3 mm wetsuit is a common starting point, not a year-round guarantee of warmth. Colder conditions may need thicker neoprene, boots, gloves and a hood; ask the school what suits that day.
The suit should fit closely without restricting breathing or shoulder movement. Loose folds and gaps let cold water flush through, while a rash vest won’t rescue an unsuitable wetsuit.
Hire for your first few sessions. Check the leash cord, attachment and cuff with the instructor, and remember that a leashed board can still strike someone nearby.
For your bag, bring dry clothes, a microfibre towel, a locker padlock and water-resistant sun cream and lip balm. Choose reef-conscious products, but don’t treat that label as proof they’re harmless.
Sort sun protection and dry storage before buying surf clothing. Leave valuables securely ashore, because a dry bag left unattended on the beach isn’t secure storage.
How to Pop Up on Your First Board
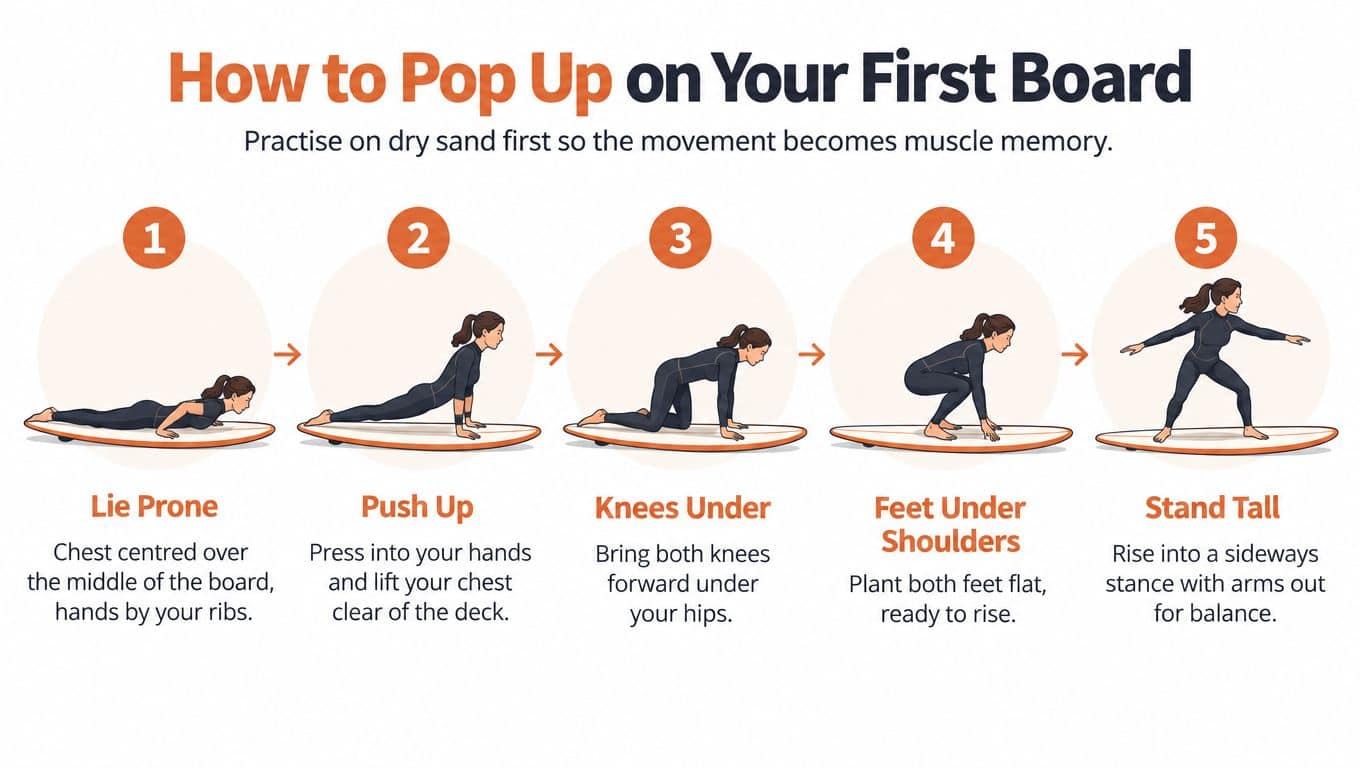
Practise on firm sand before adding moving water. Use an outline in the sand or a board positioned as your instructor directs, rather than loading fins against the ground.
This illustration gives you a movement reference, but keep your finishing stance low rather than standing bolt upright.
Build the movement before chasing speed
Lie centred on the board. Position your chest over the middle, with hands beside your ribs and legs together. Too far forward buries the nose; too far back makes the board drag.
Paddle with steady alternating strokes and look ahead. Short, frantic splashing wastes effort, while staring at the deck pulls your posture down.
Wait until the white water carries you. Place your palms flat beneath your shoulders once the board starts sliding with the wave. Pushing up too early stalls the attempt before you’ve caught it.
Press through your arms and bring your back foot forwards towards the centre line. Make space beneath your hips rather than throwing your shoulders backwards, which lifts the nose and kills momentum.
Bring your front foot between your hands, landing in a sideways stance with bent knees. Reaching too far towards the nose can make it dive, so aim for balanced placement rather than a huge stride.
Look towards your route, with arms relaxed for balance. Keep your weight low and centred, letting your knees absorb movement. Looking down at your feet usually makes balance harder just when you need it.
If you fall, move away from the board and protect your head with your arms. Fall as flat as practical rather than diving or jumping feet-first into shallow water, then surface cautiously because the leash can pull the board back.
Different bodies need different teaching approaches. A coach may use a knee-assisted movement initially, but you shouldn’t get stuck kneeling if you can learn a direct transition safely.
Fix the cause of the fall
If the board shoots ahead while you fall backwards, check whether you’re leaning away from the movement. If the nose dives, ask the instructor to check your lying position, foot placement and wave choice rather than assuming you need to pop up faster.
Try a ten-minute land drill before the session, stopping before fatigue makes your movement sloppy. Aim for repeatable foot placement on most attempts, not an impressive jump.
Use the video to compare the timing with your beach practice.
A good pop-up becomes a smooth transition: the board is moving, your feet land beneath you, your knees stay bent and your eyes stay forward. Your first lesson may only produce brief rides, and that’s still useful progress.
How to Escape a Rip and Stay Safe
Rip currents are a significant hazard on UK beaches. The Met Office’s guidance on understanding rip currents explains how they can pull swimmers away from shore. If the water carries you out, act early, while you still have strength.
Keep hold of your board for flotation. Don’t abandon it to attempt a harder swim.
Stay calm and don’t swim directly against the current. Fighting it can use up your strength without bringing you closer to shore.
Raise an arm and call for help. Signal as soon as you need assistance, not only when you’re exhausted.
If able, move parallel to shore until you’re clear of the rip. Stay with your board and avoid exhausting yourself trying to escape.
Once clear, head towards shore and wade when you can safely stand. Follow lifeguard instructions.
An offshore wind can carry a beginner beyond the break while they’re focused on balancing. If you notice yourself drifting out, signal early and follow rescue instructions rather than paddling until exhausted. Moving parallel may help you escape a rip, but it won’t stop an offshore wind from carrying you farther out. If you can’t make progress towards safety, stay with your board and keep signalling.
Check the flags before entering the water.
Red and yellow flags mark the supervised swimming and bodyboarding area, not the surfboard area. Ask lifeguards where to surf before you paddle out.
Tell someone your plan: Leave your beach location and expected return time with someone ashore.
Check equipment: A damaged leash or poorly fitting kit can cause problems in the water.
Help from shore: Alert rescuers rather than entering the water after someone and becoming another casualty.
Get out while you can still paddle and think clearly. Shivering, exhaustion or repeated loss of control are reasons to stop, not challenges to push through.
Progression From Foam to Unbroken Waves
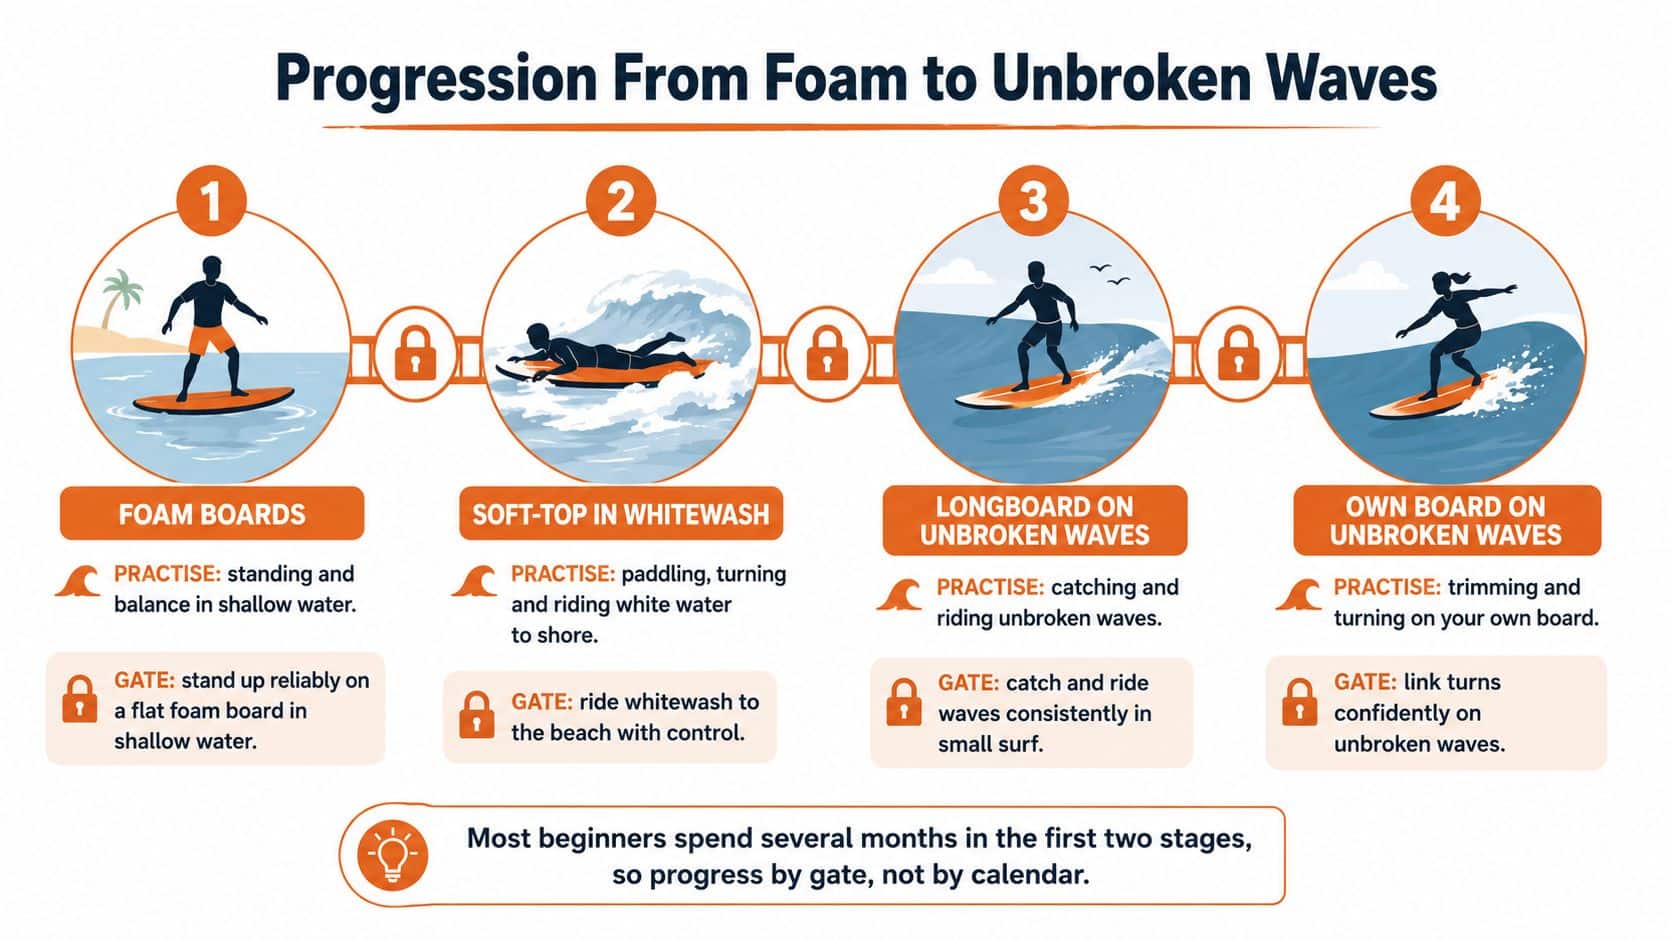
Progress by what you can control, not by how many days you’ve booked. Catching a lucky ride doesn’t mean you’re ready to paddle into a crowded lineup.
Progression stages and the gate to move on
Stage
What to practise
Move on when
1. Foam and white water
Prone paddling, popping up in waist-deep foam, controlled falls
You pop up on most attempts in shallow foam
2. Turns and balance
Riding along white water, first turns, staying on longer
You ride towards shore on most waves with control and can stop safely
3. Deeper water and lineup
Using a designated paddle-out route, reading sets, sharing the peak
You can paddle out, wait and catch a wave without collisions
4. Independent practice
Surfing lifeguarded beaches in conditions you assess yourself
You’ve had accredited instruction and can repeat the go/no-go checks
The progression below is a broad illustration, not a requirement to buy a different board at every stage.
Sharing waves is part of the skill
The BBC's surfing-etiquette guide explains that the surfer closest to the breaking part of the wave has priority, whether it breaks left or right. That surfer decides whether to take off; you mustn't paddle across their riding path.
Snaking means deliberately paddling inside another surfer to get nearer the peak and claim priority. It's poor etiquette, and it creates unpredictable movements where people need space.
Check both directions before committing, yield to the surfer nearest the peak and use the agreed paddle-out route. If someone's already riding, don't launch into their path because you think there's room.
Moving into deeper water before you can control your board and exit is a common mistake. You add fatigue, wave-reading decisions and other surfers before the basic movement is dependable.
Give your next sessions a purpose
Next session: Repeat controlled white-water take-offs and safe dismounts.
Following session: Practise keeping your line, stopping deliberately and making small direction changes.
Then reassess: Ask your instructor whether your paddling and judgement are ready for small unbroken waves.
You may spend several lessons on the first stage. That's more useful than reaching deep water early and spending the session frightened or exhausted.
If you enjoy being in the sea but not the breaking waves, explore which watersport suits your trip rather than forcing surfing to be your thing.
Plan Your First Surf Trip and Book Your Lesson
For a first surf trip, make the go-or-no-go call before building the itinerary around a lesson. Newquay is a practical base for pairing surf sessions with beach time and other activities, while trips to more remote beaches may need extra transport planning. Conditions change, and no beach is beginner-friendly in every swell.
Beginner-friendly UK surf spots
Spot
Why it suits beginners
Plan around
Tolcarne Beach, Newquay
Sheltered, sandy and popular with surf schools
Seasonal lifeguard cover, tide times and whether shelter is helping that day
Watergate Bay, Newquay
Wide sandy beach with room to spread out
Lifeguard season, wind direction and exposure to swell
Woolacombe, North Devon
Long sandy beach with gentle waves on the right days
Lifeguard season and rip checks
Croyde, North Devon
Learner sessions are possible in suitable conditions
Busy summer crowds and powerful, dumping waves, especially when conditions change
Bridlington, East Yorkshire
Sandy coastline with a documented surfing history
Forecast, tide, seasonal lifeguard cover and lesson availability
Trains reach Newquay on the branch line from Par, with buses and coaches offering other connections. Check current timetables before paying for a lesson, and allow time to reach the beach, change and attend the briefing.
St Christopher’s Newquay gives you a base near the two of Cornwall’s best surf beaches with an on-site surf school and communal space to meet other travellers after your session. If conditions rule out surfing, use this guide to Newquay attractions to plan another way to spend the day.
Check where you can change and store your bags as well as where you’ll sleep.
Booking direct at St Christopher’s offers at least a 5% saving on the best online rate, no deposit, flexible free-cancellation options, 25% off food and a free welcome drink. Check the cancellation terms and deadline for your chosen rate before paying.
Book the lesson, confirming what equipment is included and what happens in bad weather.
Check conditions the night before, then assess them again that morning before setting out.
Book your stay direct, and choose a rate whose benefits and cancellation terms fit your plans.
St Christopher’s offers a social Newquay base, with a place to meet fellow travellers after your session. Check your dates and booking terms at St Christopher’s , then plan around a supervised first lesson and the conditions on the day.
Our direct rates are guaranteed to be at least 5% cheaper than anywhere else online, with a free drink on arrival, 25% off food at the bar, and free cancellation options available.